
Taking Great Photos in Classrooms.
As a school marketing photographer I shoot a really wide range of subject matter from classrooms, to sport, to music, drama, forest school and portraiture. I am often asked about the different techniques I use to capture these different genres so I thought it might be useful to share a few ideas and tips.

Today I am going to talk about Classroom Photography.
It goes without saying that my primary objective when taking photos of kids in a classroom is to produce images that grab the viewer’s attention. I want the viewer to look twice, three times at the photo and feel a connection with the subject. I try to achieve this in several ways:
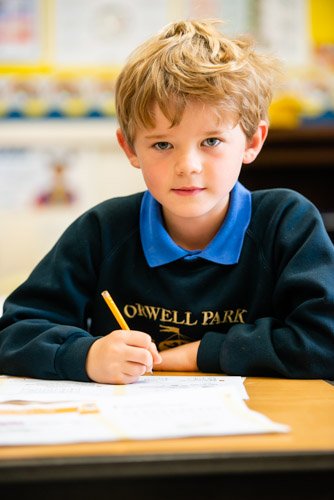
Get Down! I make sure I am at the level of the subject. If they are on the floor I get on the floor. If they are sitting at a desk I kneel down to be at their eye level. A photo taken by an adult standing up with the camera pointed down at children is always going to feel like a photo taken by an adult looking down at children. Whereas if you shoot from a child’s eye level, as if from another child’s viewpoint, then you enter their world, feel closer to them and are more likely to make an emotional connection with them.


On a similar note, if I introduce a teacher to the photo I always ask them to get their head on the similar level to the children, allowing me to shoot them eye-to-eye. This creates an intimacy not possible if the teacher is standing up, and it often leads to plenty of smiles and giggles!


Use the Right Lens! I use a pretty long lens to shoot in classrooms, usually a 70-200mm. The long focal length, combined with a wide aperture of f2.8, blurs the background and foreground. Classrooms are often quite busy and cluttered so this technique helps to isolate the subject and make them stand out from the background.


My other go-to lens in a classroom situation is a super wide-angle lens. This allows me to be almost on top of the action and brings a really different perspective. I might use this lens is during a science experiment where there’s a line of test tubes or beakers in the foreground that will add nice colour to the photo. It’s not as effective as long lens but it does give a different perspective/feel to the photo.

Fill the Frame! I like to fill the frame with the subject, especially in classrooms. If I were shooting against a blue sky or green field I might compose the photo and leave space around the subject which can be useful if text needs to be added. But in a classroom it’s usually best to zoom in on the subject so that they fill the whole frame and any possible distractions are cropped out of the frame.

Use the Background! As you will have gathered I am keen on avoiding distracting backgrounds! But equally I am always on the lookout for interesting backgrounds that might add to the photo. These could be a lights or wall designs or photos. It's rare that they work but when they do they can add a lot to a photo.


Be Patient! I always have an idea of what I want each photo to look like but often have to be patient, waiting for the perfect, natural moment. And when it happens I shoot a lot of photos very quickly to ensure I capture exactly what I had in mind. I might sometimes ask a pupil to redo an action they had just done, but mostly I try to shoot without any interference.


I hope that these tips are useful to anyone working in school marketing departments. Hopefully you can adopt them and create some lovely images in the classrooms at your school.
